Introduction
Definition of a Handstand
A handstand is an inverted position where you balance on your hands with your body fully extended vertically. It’s a fundamental skill in gymnastics, yoga, and fitness that demonstrates balance, strength, and body control.
Importance of Learning a Handstand
Learning a handstand is not only impressive but also beneficial for your overall fitness. It improves balance, builds upper body and core strength, and enhances body awareness. It’s a versatile skill that can be integrated into various workout routines and sports.
Benefits of Doing Handstands
Handstands offer numerous benefits:
- Strength Building: Enhances muscle strength in the shoulders, arms, and core.
- Balance Improvement: Increases overall balance and stability.
- Coordination: Develops better coordination and body control.
- Mental Focus: Requires and improves concentration and mental discipline.
- Confidence Boost: Achieving a handstand can significantly boost your confidence and sense of accomplishment.
Preparing for a Handstand
Warm-up Exercises
Warming up is essential to prepare your body for the physical demands of a handstand. Effective warm-up exercises include:
- Jumping Jacks: To increase heart rate and blood flow.
- Arm Circles: To loosen up shoulder joints.
- Wrist Circles and Stretching: To prepare wrists for bearing weight.
Stretching Routines
Stretching improves flexibility and reduces the risk of injury. Focus on:
- Shoulder Stretches: Such as shoulder flexion stretches.
- Hamstring Stretches: To increase leg flexibility.
- Back Stretches: Like the cat-cow pose in yoga to prepare the spine.
Building Upper Body Strength
Strengthen your upper body with exercises like:
- Push-ups: To build shoulder and arm strength.
- Planks: To engage the core and shoulders.
- Dumbbell Shoulder Press: For targeted shoulder strength.
Improving Core Strength
A strong core is vital for maintaining stability in a handstand. Effective exercises include:
- Sit-ups and Crunches: To target abdominal muscles.
- Leg Raises: To engage lower abdominal muscles.
- Russian Twists: For oblique strength.
Enhancing Balance and Coordination
Balance and coordination are key to holding a handstand. Practice with:
- Single-Leg Balances: On flat ground or a balance board.
- Yoga Poses: Such as tree pose to enhance balance.
- Coordination Drills: Like ball-catching while balancing on one leg.
Safety Precautions
Creating a Safe Practice Space
Ensure your practice area is free from obstacles and has a soft surface, like a yoga mat, to cushion any falls.
Understanding Your Limits
Listen to your body and avoid pushing yourself too hard, especially in the beginning. Gradual progress is safer and more sustainable.
Having a Spotter (Optional)
Having someone to spot you can provide extra safety and confidence as you learn to balance on your hands.
Handstand Basics
Understanding Hand Placement
Proper hand placement is crucial. Place your hands shoulder-width apart, fingers spread wide to distribute weight evenly.
Proper Body Alignment
Maintain a straight line from your hands to your toes. Keep your body tight and engage your core to prevent arching your back.
Engaging the Core
Engage your core muscles to stabilize your body and maintain balance. A strong core helps keep your body in a straight line.
Breathing Techniques
Breathing steadily and deeply helps maintain focus and provides oxygen to your muscles. Practice controlled breathing as you hold your handstand.
Step-by-Step Guide to Handstand
Finding the Right Wall Space
Use a wall to practice and build confidence. Ensure it’s clear of any obstacles and has enough space for you to kick up into a handstand.
Wall Walk Handstand
- Start in a plank position with your feet against the wall.
- Walk your feet up the wall while walking your hands closer to the wall.
- Aim to get your body as vertical as possible, with your chest facing the wall.
L-Kick Handstand
- Face the wall and place your hands on the ground about a foot away from the wall.
- Kick one leg up, using the wall for support, while keeping the other leg bent at a 90-degree angle.
Free-Standing Handstand
- Start with your hands on the ground and kick up into a handstand.
- Use your core and balance to maintain the position without support.
- Focus on keeping your body straight and controlled.
Common Mistakes and How to Fix Them
Incorrect Hand Placement
Placing hands too wide or too narrow can cause imbalance. Ensure your hands are shoulder-width apart and fingers are spread wide.
Arching the Back
Avoid arching by engaging your core and squeezing your glutes. Practice against a wall to help maintain proper alignment.
Bent Arms
Bent arms can lead to instability. Focus on keeping your arms straight and locking your elbows.
Kicking Up Too Hard
Control your kick-up to prevent overshooting. Practice gentle, controlled kicks to find the right amount of force.
Progressive Drills for Mastery
Shoulder Taps
From a handstand position, gently tap each shoulder alternately to build shoulder strength and stability.
Handstand Walks
Practice walking on your hands to improve balance and coordination. Start with small steps and gradually increase the distance.
Handstand Push-Ups
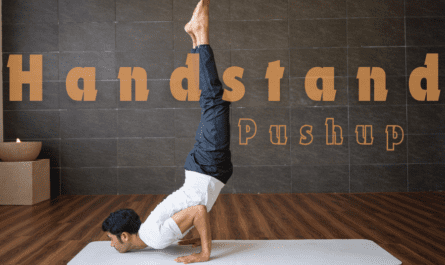
From a handstand position, lower yourself by bending your elbows and then push back up. This drill builds significant shoulder and arm strength.
Developing Confidence
Mental Preparation
Visualize yourself successfully performing a handstand. Positive visualization can boost confidence and reduce anxiety.
Visualization Techniques
Imagine each step of the handstand process, from the kick-up to holding the position. Visualization helps create a mental blueprint for success.
Overcoming Fear of Falling
Practice falling safely by performing controlled cartwheels out of a handstand. Knowing how to fall reduces fear and builds confidence.
Maintaining Handstand Form
Regular Practice Tips
Consistent practice is key. Aim to practice handstands several times a week, gradually increasing duration and difficulty.
Adjusting to Your Body’s Feedback
Listen to your body and adjust your practice based on how you feel. Avoid overtraining and take breaks as needed.
Advanced Handstand Variations
Handstand Tucks
Bring your knees towards your chest while in a handstand. This variation challenges your core and balance.
Straddle Handstands
Extend your legs wide apart in a straddle position. This variation improves flexibility and control.
One-Arm Handstands
Shift your weight to one arm and lift the other off the ground. This advanced variation requires significant strength and balance.
Handstand Workouts
Integrating Handstands into Fitness Routines
Combine handstands with other exercises like push-ups, planks, and squats for a comprehensive workout.
Combining Handstands with Other Exercises
Incorporate handstands into circuits or interval training for added challenge and variety.
Recovery and Rest
Importance of Rest Days
Rest days are crucial for muscle recovery and preventing injury. Ensure you allow time for your muscles to heal.
Stretching Post-Handstand
Stretching after practice helps improve flexibility and reduce muscle soreness. Focus on shoulders, back, and legs.
Addressing Muscle Soreness
Use foam rolling, massage, and gentle stretching to alleviate soreness and promote recovery.
Handstand Challenges and Competitions
Participating in Handstand Challenges
Join online or local handstand challenges to test your skills and stay motivated. These challenges often provide structured goals and community support.
Preparing for Handstand Competitions
If competing, follow a structured training program, focus on technique, and ensure you’re well-rested before the event.
Personal Stories and Case Studies
Success Stories of Beginners
Share stories of individuals who successfully learned handstands, highlighting their journey and the challenges they overcame.
Professional Handstand Performers’ Insights
Provide insights and tips from professional handstand performers on achieving and maintaining perfect form.
Expert Insights
Tips from Gymnasts and Trainers
Include expert advice from gymnasts and trainers on best practices for learning and perfecting handstands.
Advice from Physical Therapists
Share physical therapists’ insights on avoiding injuries and maintaining proper alignment during handstands.
FAQs
How long does it take to learn a handstand?
Learning a handstand can take anywhere from a few weeks to several months, depending on your starting fitness level and practice consistency.
What are the common injuries associated with handstands?
Common injuries include wrist strain, shoulder injuries, and lower back pain. Proper technique and conditioning can minimize these risks.
Can handstands help improve posture?
Yes, handstands can strengthen the muscles that support good posture, particularly the core and upper back muscles.
Is it safe for everyone to do handstands?
While most people can safely learn handstands, those with certain medical conditions or injuries should consult a healthcare professional before practicing.
Conclusion
Recap of Key Points
Learning to do a handstand involves building strength, practicing balance, and maintaining proper form. With consistent practice and attention to safety, anyone can master this impressive skill.
Encouragement to Start Practicing
Start with the basics and gradually progress to more advanced variations. Remember, persistence and patience are key.
Resources for Further Learning
Explore online tutorials, join handstand workshops, and seek guidance from experienced trainers to continue improving your skills.


